
Activities
- Habitat characterization
- Scientific illustration
- Designing a study
- Pitfall trapping
- Analyzing diversity data
Overview & Opportunities
- Learn about insects and other arthropods through images and video
- Observe, record and analyze data about local arthropod diversity
- Learn how to make and set simple traps for arthropod collection
- Analyze data from a PhD student at UA
- Use technology to share data, media (images, movies, audio) and to talk about your work
Biodiversity Information
Biodiversity is the variety of life that exists on our planet. We can think about this variety at many different scales, from the diversity of genetic material within a single species to the diversity of biomes within an entire geographical region.
When biologists set out to study the diversity of a specific place they usually focus on the diversity of one or a few taxa. A taxon (plural: taxa) is simply a group of related organisms. Why don’t biologists study the diversity of all life within their study areas? One reason is simply because species identification requires expert knowledge. A person with expert knowledge in species identification is called a taxonomist. It often takes a taxonomist many years of work to develop the skills needed to be able to quickly identify the species they study. Thus most taxonomists have knowledge of only a few groups of organisms, which limits the scope of most diversity studies. For example, it took a group of scientists studying the diversity of several taxa (birds, butterflies, beetles, ants, termites, and nematodes) in a forest reserve in Cameroon 10,000 hours to identify the 2,000 species that were collected during the study1.
So how do we decide which taxa we should study? Although arthropods can be difficult to identify, they make good focal taxa because they are essential to many ecosystem processes such as decomposition and pollination. Because humans depend on arthropods to carry out these processes, it is important to monitor the health of arthropod communities in the environment. Another reason that arthropods make good focal taxa is that they often exhibit a high degree of habitat specificity. For example, many herbivorous insect species depend entirely on one or a few species of plant for food. Very few vertebrate species are as specific in their dietary requirements. Thus, by studying the diversity of arthropods we are often able to gain insight into other habitat characteristics, such as the diversity of the plant community.
What do you know about arthropods?
Think about the different arthropods that you have seen around the schoolyard and in your neighborhood (USE SCIENCE YOUR SCIENCE NOTEBOOK and perhaps your class blog or wiki, see Online: Collaborate /Talk about it /Contribute / Share: below)
- On your own, or with a friend or your classmates, make a list of the bugs you have seen around your school or home. In what kinds of habitats have you seen the different insects? At what time of day do you see particular bugs?
- Next, make a web of how the different types of arthropods you know are related either through food chains or through their evolutionary history. (Hint: It may be helpful to first categorize the arthropods on your list.)
Initial Exploration
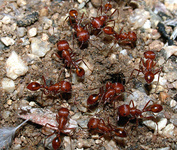
Choose a few spots to observe and see what you find. How do you want to organize your observations? You may want to view:  View Exploring Backyard Ant Diversity in the Sonoran Desert: Pogonomyrmex
Science / Field Notebook
Draw and take notes in a notebook.
Always record:
- time of day, date
- names of people in your group
- site name/location
- weather conditions: for example, is it hot, cool, windy, sunny?
- Ground cover, canopy (tree, bushes etc) cover
You can also record:
- Organisms present (and also not present). You can use this identification guide if you would like: Backyard Insects of Tucson
- Temperature of soil, air and water temperature
As you make your observations try to note the different microhabitats within your schoolyard or backyard. It will be important to understand the microhabitats within your schoolyard when we design our study. What is a microhabitat? For that matter, what is a habitat? A habitat is simply the place in which an organisms lives. Smaller habitats can be found within larger habitats, and a microhabitat is simply a smaller specialized habitat contained within a larger habitat. For example, we might speak of a grassland as a habitat and an individual clump of grass as a microhabitat within the grassland. A different suite of species can be found in each type of microhabitat. This means that if want to estimate the total diversity of the schoolyard environment we must make sure to sample from each microhabitat within the schoolyard.
If you decide to focus on a particular species:
- What time of day is the species active?
- Where does the species forage (look for food)?
- Where does it make its home? In the summer? In the winter?
- Does it forage in groups or alone?
- What type of locomotion does the species have?
Offline: Collaborate/Talk about it/Contribute:
- Science notebook: (have link to tips on how to keep sci notebook): keep notes and drawings in your notebook.
- As a class make a map of the different locations and then add your observations on a daily basis.
Online: Collaborate /Talk about it /Contribute / Share:
- Blog to share some of your observations. Your class can make a blog by using wordpress, blogger, or a host of other blogging platforms (we like wordpress).
- Use a class wiki - your class can use pbwiki.com, or wikispaces.com to create a class wiki.
What is an Arthropod?
Now that you have done some observations and some thinking and you are going to set your traps, it's a good idea to find out a little more about the organisms that will be falling into your traps. Although we are primarily concerned with insects, we will discover many other types of arthropods as we explore the variety of microhabitats that exist within our backyards and schoolyards. What is an arthropod? Arthropoda is one of many phyla (singular: phylum) in the kingdom Animalia. The principal characteristics of an arthropod are:
- A segmented body
- Bilateral symmetry
- Hard exoskeleton
- Paired segmented appendages (jointed legs)
Within the phylum Arthropoda are many different classes of arthropods. For example, spiders, scorpions, and ticks are in the class Arachnida, and horseshoe crabs are in the class Merostomata. Insects are classified as Hexapoda. The Hexapoda all share the following characteristics:
- Three segmented body (Head + Thorax + Abdomen)
- Six legs arising from the thorax
- One pair of antennae
- One pair of mandibles
More information on arthropods:
- The Arthropod Story (http://tolweb.org/treehouses/?treehouse_id=3923)
- Introduction to the Arthropods (www.ucmp.berkeley.edu/arthropoda/arthropoda.html)
Meet A Researcher
Who studies this kind of stuff?
- Kim Franklin, PhD Student in the Interdisciplinary Program for Insect Science at the University of Arizona. Kim’s main interest is in the incredible diversity of insects found in the Sonoran Desert and the roles that these insects play in the ecosystem processes that maintain our environment in its normal healthy state. Find out more about Kim’s work and how she crafted her study that is her PhD research.
- You do!
How do we measure diversity?
Above we discussed why and how scientists select which group of organisms to study. We also have to decide if we want to measure the diversity of this group at the species level or at some higher level such as genus, family, or order. (Remember Kingdom, Phylum, Class, Order, Family, Genus, Species?) Most often scientists describe diversity at the species level. But what exactly is a species and how is a species different from a genus? A species is group of organisms that is genetically distinct from all other groups of organisms. An individual of a given species can only breed with another individual also from the same species. A genus is a group of closely related species. And if we continue up the chain of biological classification we find that families are groups of related genera and so on. We can choose to measure diversity at any level of classification. The diversity of arthropods is often measured at the level of family or order simply because the expertise to identify most arthropods to species does not exist.
When we set out to measure diversity, it is important that we have a clear question in our heads. Sometimes scientists need to inform policy makers of the diversity of a geographical area such as a park or an area targeted for development. Often scientists want to compare the diversity of different habitat types. In order to be able to compare the diversity of one area or habitat to another we have to employ standardized sampling methods. This simply means that we have to sample the diversity of the two habitats in exactly the same manner. Often there are standardized sampling methods used by many scientists across the planet. By conforming to these methods we may be able to compare the results of our study with those of scientists working in different locations.
Designing a study
Before we start sampling the arthropods in our schoolyards, we need to think carefully about the purpose of our study. Two questions that we'd like you to try to answer are:
- What is the diversity of arthropods of the different microhabitats within your schoolyard?
- How does the abundance and diversity of your schoolyard compare with the diversity of other schoolyards in Tucson?
We will use pitfall traps, which are are simply open containers set into the ground in such a way that unsuspecting arthropods walking along the soil surface fall into the container. These traps are widely used by scientists to monitor insect diversity and to investigate effects of different land uses. Refer back to your field notebooks to make a list of the different microhabitats you encountered in your schoolyard. If we want to capture the total diversity of ground dwelling arthropods in the schoolyard we need to sample from each microhabitat. Although you might have recorded many microhabitats in your initial observations, you might only be able to sample some of them.
Formulating Specific Questions and Hypotheses
Although we have given you two questions to answer, you should think of your own questions about the abundance and diversity of arthropods in your schoolyard. The first step in developing your own questions is to think about the observations you made during your initial explorations of the schoolyard habitat. Did you notice any patterns in these observations? You may already have had some ideas that led you to choose particular microhabitats that you'd like to sample, but also look over the observations you took in your field notebook and think about the following questions:
- In which microhabitat did you observe the most arthropods?
- What types of arthropods were found in the different microhabitats you observed?
- What types of behaviors did you observe in different arthropods? In different microhabitat?
Brainstorm on your own and then with the class. As a class, select one "why" question about that you'd like to answer about the observations you made. Now come up with a hypothesis, or a potential answer to your question. A hypothesis is a possible explanation for your observations. A hypothesis is thought of as an educated guess because you use what you have already observed and your prior knowledge to formulate an explanation for your observations.
Now it’s time to set your traps. The first decisions you have to make are how many traps and how to arrange the traps. Since we are hoping that you will compare your data to data from other schools, it will be important that classes from all schools follow a similar protocol. We suggest that you use five pitfall traps in each microhabitat you will be sampling and that you space your traps five meters apart along a line that runs through the center of the microhabitat. This would result in a line 20 meters long.
Although this seems like a reasonable distance you might have smaller microhabitats in which a 20 meter long line will not fit. For example, suppose you only have one tree in your schoolyard, and the rest of the area is open and sunny. You’ve decided that the tree constitutes one microhabitat and the rest of the schoolyard another microhabitat, but there isn’t enough room under the tree canopy to set a 20 meter long line of pitfall traps. In this case you will have to decide on your own protocol. It is extremely important that you record your protocol in your field notebook because if you don’t know how the data were collected, the data become almost useless.
Pitfall Trapping
View Exploring Local Arthropod Diversity, Part 1 Creating Pitfall Traps Materials Needed
- plastic cups
- isoproply alcohol (don't use if a concern, some educators advise against its use)
- water
- soap
- forceps (plastic)
- jars
- masking tape
- mallet
- pick
- garden, school grounds or other outdoor area
- science notebook
- pencil
- *digital camera
A pitfall trap can be made from almost any cup-like container, but plastic cups that fit into each other are the most convenient. The first step is to dig a hole slightly deeper than the cups themselves. Then place three stacked cups into the hole. You will understand why we need three cups shortly. Fill in the area around the cups with dirt until the cups are snuggly in place. You will probably knock a lot of dirt into the top cup while doing this, but when you are finished pull out the top cup, leaving two cups in the ground. At this point you should make sure that the lip of the remaining cups is flush with ground level such that a tiny insect walking along the ground would not encounter any obstacles as they go towards the cup. This is the most important part of setting a pitfall trap. Some insects are more wary than others and if they bump into the lip of the cup or an unusual dip or bump in the ground surface, they will head off in some other direction, which would bias your pitfall trap samples to the less wary insects walking around the schoolyard.
After you are satisfied with the positioning of your cups you will pour a mixture of mildly soapy water and isopropyl alcohol to fill your cup about 1/3rd full. This mixture will preserve the arthropods until you return to collect the cups. The traps should be left in the ground for 72 hours, which will allow plenty of time for insects to fall into the traps. In addition, if each school uses the same length of time, we will be able to make more rigorous comparisons of arthropod diversity among schools. Before leaving your field site you should record the date and time that you set your traps in your field notebook.
During the 72 hours that the traps are operating you should occasionally return to your traps to make sure that they are still set properly. Animals such as birds and rodents will often take an interest in the traps and even attempt to eat insects that have fallen into the trap. If the top cup has been filled with dirt, you can remove it, empty the dirt into another container, and replace the cup with fresh mixture of water and alcohol. You should look through the emptied dirt for any arthropods that might have fallen into the trap. Remove these arthropods and place them in a container with alcohol and label the container.
Collecting Your Pitfall Traps
After 72 hours you will collect your pitfall traps. The most important part of collecting you traps is labeling. The content of each pitfall trap should be transferred to a separate container and clearly labeled. The label should be written in pencil on a piece of sturdy paper and placed inside the container. We use pencil because almost all ink will dissolve in alcohol, and we place the label inside the container because labels taped to the outside of containers frequently fall off or are somehow destroyed. The label should contain the following information:- number and location of trap (eg. pitfall trap 3 from grassy microhabitat)
- date that the trap was collected
- name of the collector
Sorting the Contents of Your Pitfall Traps
Now you will sort through the contents of your trap, removing all arthropods from the tray and placing them in a permanent container filled with alcohol. Alcohol evaporates very easily in our arid climate, so you should check your containers every few weeks to ensure that the alcohol has not evaporated. As you are sorting, you will occasionally encounter a bit of material that you are not able to identify as plant or animal. Keep this material. Examination with a microscope at a later date should be able to clear up any confusion. After all of the arthropods have been removed from the tray, make a permanent label with pencil on sturdy paper to be stored inside the jar.
Identification
Identifying the different types of arthropods that have fallen into your traps is not an easy task, but there are many online resources that will make this task much easier. We are hoping that you will be able to identify the different orders of insects that have fallen into your traps, as well differentiate among the different types of non-insect arthropods. Most likely the only non-insect arthropods you will find in your trap are spiders and mites, both member of the class Arachnida. Below are links to some online resources to help you identify your insects to the level of order.
Record your own data | Analyze Data (your own and others)
The data that you record from your pitfall trap will include both abundance (the number of individual arthopods) and diversity (the number of kinds of arthropods). Counting the number of arthropods in each pitfall trap should be easy, counting the number of different kinds of arthropods can be quite difficult. Ideally we would be able to record the number of different species of arthropods in each pitfall trap, but differentiating species is not a simple task. Sometimes species differ from each other in something as trivial as the number of hairs on a certain body part. Therefore we will record the number of different arthropod orders rather than species. Refer to the identification pages in this module to learn about the different arthropod orders we will likely find in our pitfall traps.
As you examine the contents of each pitfall trap you should have your pitfall trap data sheet handy. You may actually be mounting a representative specimen of each arthropod order. As you work through your sample you should record the number of individuals of each order listed on the Pitfall Traps Abundance data sheet. This data sheet and the others you might want to use for your pitfall data can be found as shared spreadsheets on Google Docs. The link below will take you to these spreadsheets on Google Docs.
Google Documents for Pitfall Trap Data
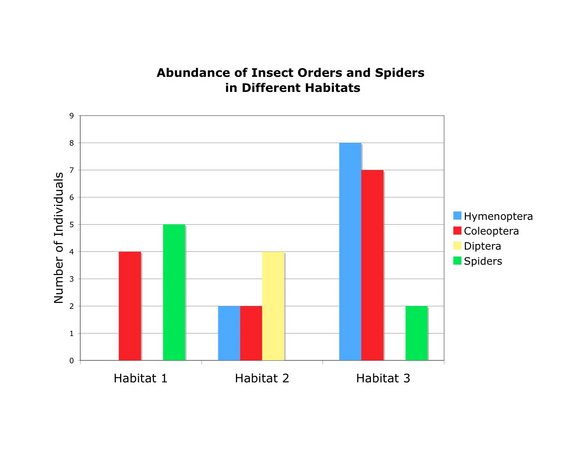
If you find orders of arthropods in your trap that are not on the data sheet, you may simply add them at the bottom of the list. After you have finished sorting all your traps, you will tally the numbers from each trap and order to be entered into the abundance and diversity data sheets. From these tables you should construct bar charts that show the differences in the abundance and diversity of your habitats. Examine the bar chart below that was created with imaginary data. This is an example of the type of chart you might construct with real data.

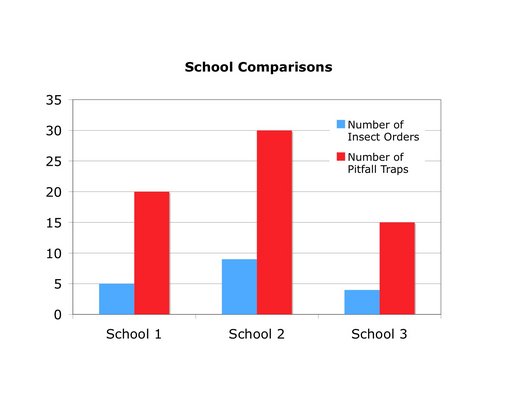
Finally, we would like you to be able to compare the arthropods in your schoolyard with those of other schoolyards across Tucson. To do so you must add your data to the schoolyard comparisons spreadsheet stored on Google Docs. Below is an example using imaginary data.
Communicating Your Results
An important part of any type of science is communicating the results of your work. In this stage you take all the work that you did forming your questions and hypotheses, observing, following the steps of the experiment, creating graphs and analyzing your data and write it up to share in text, graphic and spoken form with others. Usually scientists write a paper, then create a power point or other type of presentation in order to share their research at a conference or meeting as an oral presentation.
Here are the components that should be in your report:
- Introduction
- Background Information
- Questions, Hypotheses
- Materials
- Procedure
- Analysis
- Figures (graphs)
- Findings/Discussion
- Conclusion
- Future Research


